An incident investigation after an equipment failure is a structured process of gathering evidence, finding root causes, and implementing corrective actions to prevent the failure from recurring. It is not the same as fixing the broken part. The repair restores operation. The investigation explains why the failure happened — and what must change so it does not happen again.
Most maintenance teams respond to equipment failures. Fewer run formal investigations. That gap is expensive. Without a structured investigation, the same failure mode often repeats within months. It consumes the same emergency labor, the same expedited parts, and the same lost production time. OSHA's incident investigation guidance is clear: the purpose of an investigation is not to assign blame. It is to find causes — so the same event does not happen again.
This guide gives you a repeatable, step-by-step process for running equipment failure investigations that actually improve reliability.
Key Takeaways
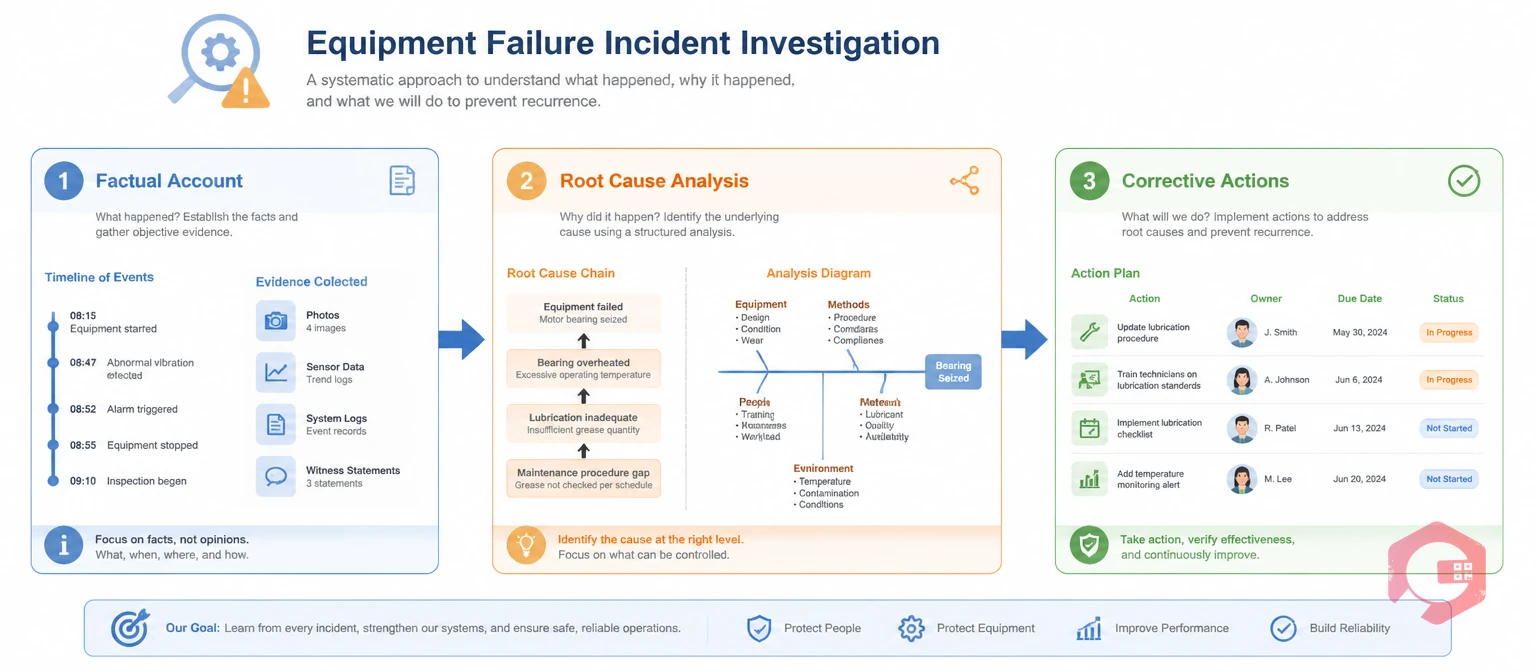
An incident investigation is the systematic process of examining an equipment failure to determine what happened, how it happened, and why. It then translates those findings into actions that prevent recurrence. It is a data-gathering exercise — not a blame exercise.
The investigation produces three things: a factual account of the failure event, an identified root cause chain, and a set of corrective actions with owners and due dates. Without all three, the process is incomplete. And the failure is likely to repeat.
Equipment failure investigations sit within the broader discipline of root cause analysis — the umbrella term for any systematic method of finding the underlying cause of a problem. But investigation and root cause analysis are not identical. Investigation focuses on fact-finding: securing the scene, collecting physical evidence, interviewing witnesses, and reconstructing the sequence of events. Root cause analysis is the analytical step that follows, where the team uses the facts gathered to identify the deepest correctable cause.
The ISO 55000 asset management standard requires that failure data be collected, analyzed, and used to improve maintenance planning. A formal incident investigation process is how organizations meet that requirement. Not through paperwork — but through a repeatable method that turns every equipment failure into system-level intelligence.

Not every equipment failure warrants a full formal investigation. Triggering one for every minor fault creates investigator fatigue. Most maintenance teams use a criticality threshold to decide when to escalate from a standard work order to a full investigation.
Launch a formal investigation when one or more of these conditions is met:
For lower-tier failures, a quick five-whys on the work order closure captures enough data. Save the full structured process below for failures that meet your escalation threshold.
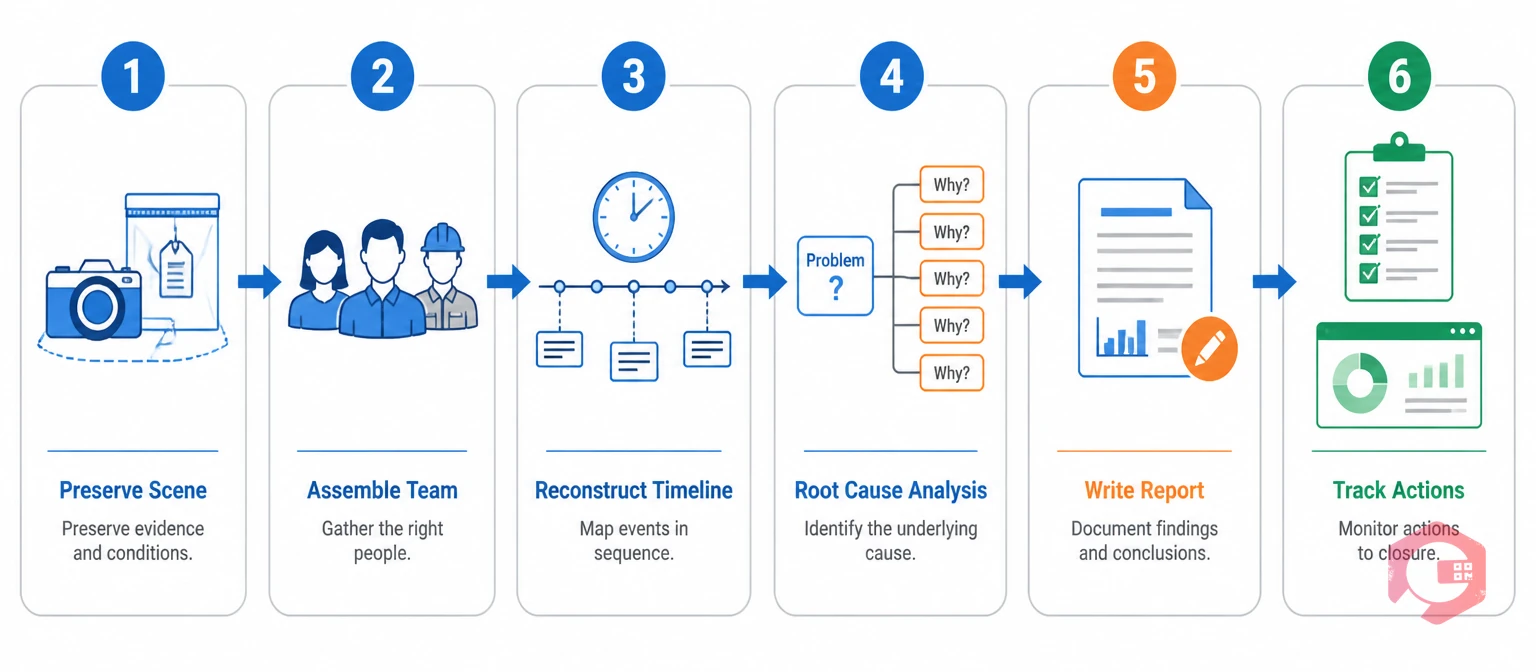
Most equipment failure investigations fail not because the team lacks knowledge but because they skip steps under production pressure. The PROVE Investigation Method gives your team a consistent structure that holds up even when the plant wants to restart immediately.
Evidence preservation is the most time-critical step in any equipment failure investigation. Once a technician begins the repair, physical evidence changes. Parts get cleaned or discarded. Lubricant traces disappear. Wear patterns get obscured. The clock starts the moment the failure occurs.
Before touching the failed equipment, the investigation team should do five things:
A single person running an investigation is a risk. They carry their own biases and miss perspectives. Effective investigations use a small, cross-functional team — typically three to five people.
A strong investigation team includes four people: a maintenance technician who knows the failed asset, an engineer who understands the failure mechanism, the operator who was running the equipment at the time, and a supervisor who leads the process without bias. On safety-critical events, add an HSE representative.
The team lead's role is to keep the process factual and forward-looking. Investigations that drift into blame lose participation. They produce defensive answers rather than honest data. Every team member must understand: the goal is to find causes in the system — not to find the person who caused the failure.
Before the team can analyze causes, they need an accurate account of what happened — in sequence, with times attached to each event. The timeline connects physical evidence, operator accounts, and sensor data into one factual narrative.
The timeline is built from three sources: interviews, sensor logs, and maintenance records. Interview everyone who interacted with the asset in the 24 to 72 hours before the failure. Ask open questions: what did you notice? What was different? What did you do? When? Record each person's account separately before bringing the team together, so one account does not shape another.
With a factual timeline in place, the team is ready to analyze causes. This is where most investigations succeed or fail. Teams that stop at the immediate cause — "the bearing failed" — produce findings that lead to parts replacement, not systemic improvement. The root cause is the condition that allowed the bearing to fail before its expected life.
Two methods work best for maintenance incident investigations. Both can be done without specialist software.
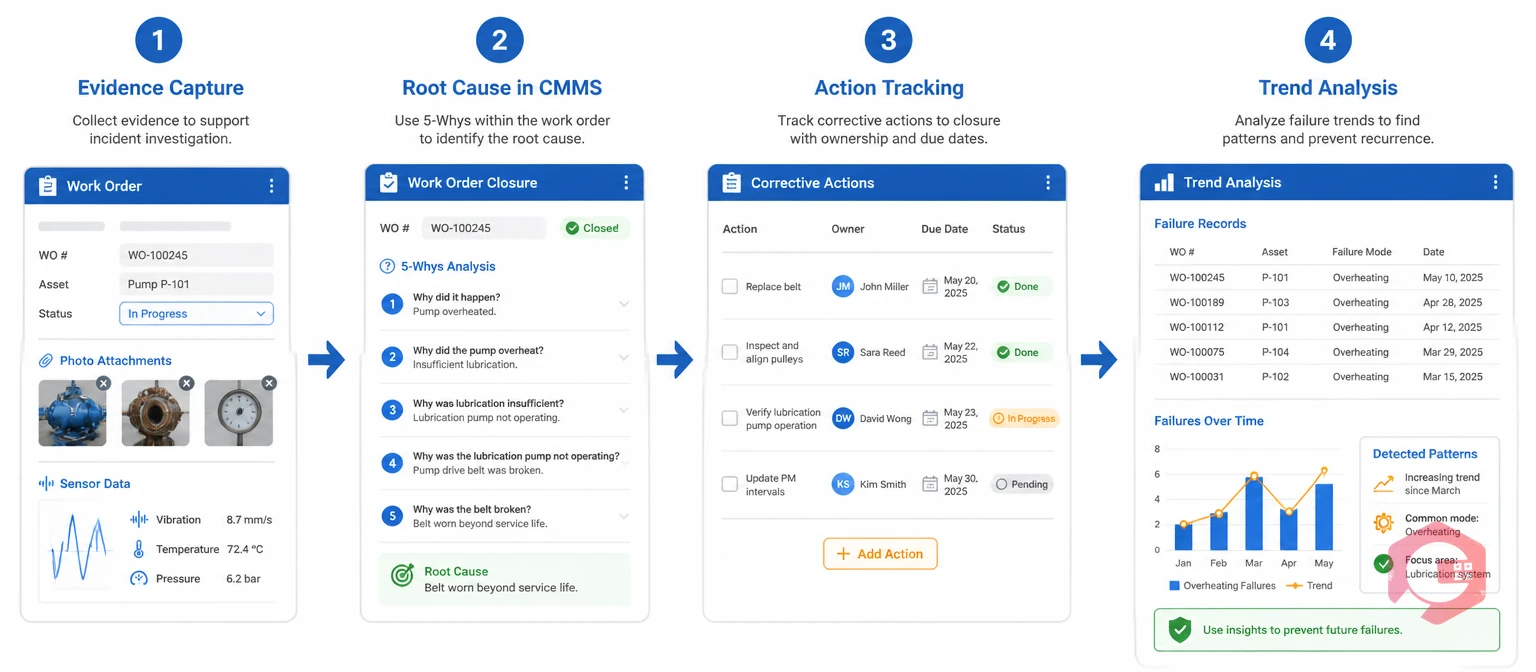
The 5 Whys is the simplest and fastest root cause tool. Start with the failure event and ask "why" five times. Each answer becomes the next starting point. Example: A bearing fails → Why? No lubrication → Why? Interval not followed → Why? No reminder in the system → Why? PM not set up in CMMS → Why? Asset was missed during initial setup. That fifth why points to a correctable system failure, not a person failure. Cryotos builds the five whys directly into the work order closure flow, so the analysis happens while the failure is fresh.
FMEA (Failure Mode and Effects Analysis) is more structured. It maps every failure mode, its effect, and its likelihood and severity. FMEA is the right tool when the 5 Whys produces multiple parallel cause chains. For most day-to-day equipment failures, the 5 Whys is sufficient. FMEA is reserved for high-consequence failures on complex assets.
In either method, the team should identify three things: the root cause, the contributing causes (factors that made the failure more likely or worse), and the detection failure (why the developing fault was not caught in time). That third category — detection failure — is where the most valuable reliability improvements often come from.
Use Cryotos's free root cause analysis investigation checklist to structure this step and ensure your team captures every required data point before closing the investigation.
The incident investigation report turns a one-time event into a lasting organizational asset. A report that sits in a shared folder and is never read has no value. A clear, concise, actionable report changes maintenance practice.
Every equipment failure investigation report needs six sections:
Keep the report short enough to be read by people who were not in the investigation. A concise report that gets read changes behavior. A long report that gets filed does nothing.
The investigation report is the input. The corrective action system is the output that actually prevents recurrence. Many organizations run thorough investigations but have no reliable mechanism to track whether corrective actions were completed. The investigation becomes a documentation exercise rather than a reliability exercise.
The final step of every incident investigation is entering each corrective action as a trackable work item — ideally in your CMMS. Each action needs an owner, a due date, and a completion check. Actions that are not tracked are rarely completed. Actions that are owned and have a due date get done.
Thirty and ninety days after the due date, the investigation lead should check: were the actions completed? Did the asset fail again? If the same failure mode recurs within 90 days, either the action was not done or it addressed the wrong cause. Either way, a follow-up review is needed.
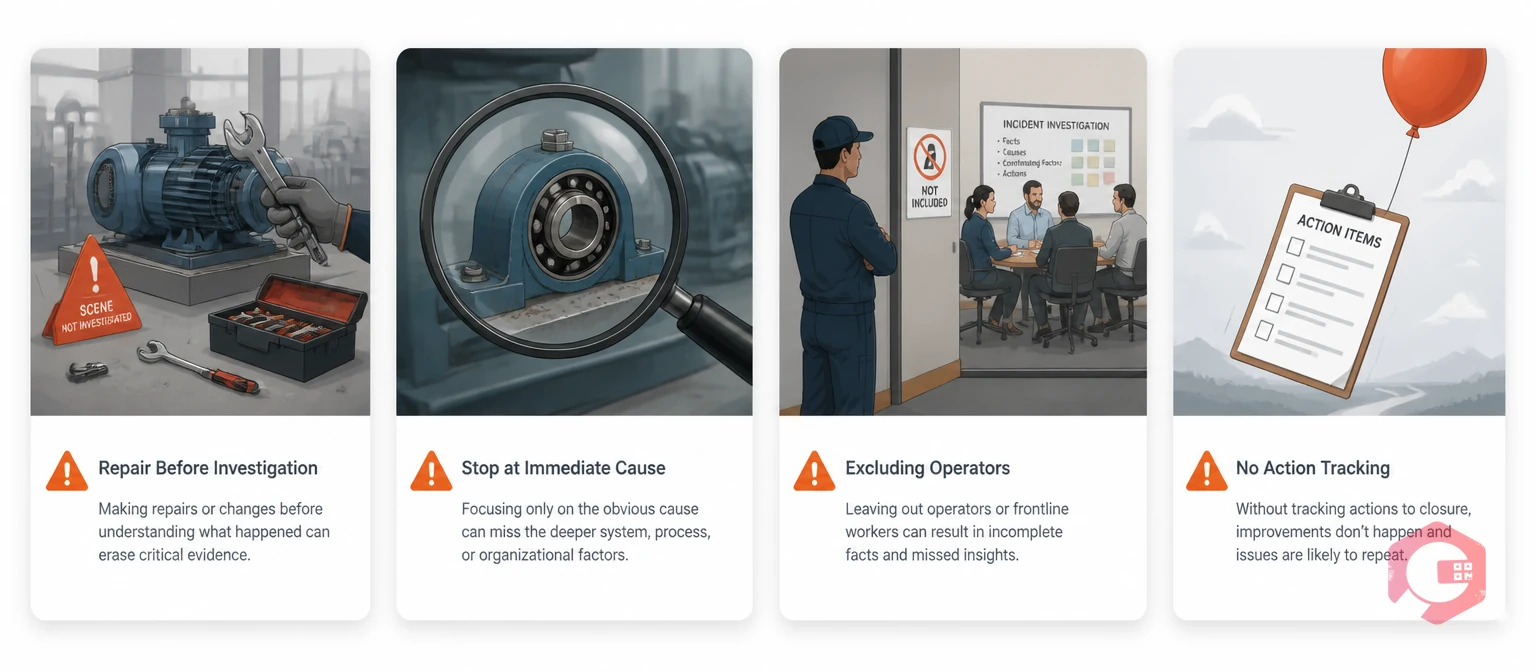
Most maintenance teams do not run bad investigations on purpose. The mistakes are almost always systemic. The same pressures that cause failures also undermine the investigations that should prevent them. The four mistakes below are the most common.
The most damaging mistake in any incident investigation is starting the repair before the investigation begins. Production pressure drives teams to restore operation immediately. But every minute of repair work after a failure degrades the physical evidence the investigation needs. The right sequence is: secure the scene and collect evidence first, then begin the repair. Even 15 minutes of structured evidence collection before repair work starts dramatically improves investigation quality.
Finding that "the pump impeller failed" is not finding the root cause. Most teams stop one or two whys short of the real cause. The impeller failed due to debris. The debris got in because the inlet strainer was blocked. The strainer was blocked because its PM was six weeks overdue. That final finding — the overdue PM — is the correctable issue. Everything before it is just description.
Operators have information maintenance teams do not. They felt the machine change hours or days before the failure. They know what was different about that shift. Excluding operators — because of shift patterns or assumptions about their knowledge — produces an incomplete picture. It misses the most human-readable signals of developing failure.
A report with corrective actions that are never tracked is a compliance document, not a reliability tool. The investigation is complete only when corrective actions are verified as done and the asset has run without recurrence for a defined period. Most operations define this as 90 days without the same failure mode returning.
A Computerized Maintenance Management System connects every stage of the incident investigation process into a single data system. Findings are captured. Actions are tracked. And the failure history is available for every future investigation on the same asset.
Without a CMMS, investigation data lives in email threads and shared folders. When the same asset fails again 18 months later, the team starts from scratch. With a CMMS, every investigation feeds an asset-level failure history that grows more valuable with every event.
Cryotos's work order management lets investigators attach photos, sensor data, and inspection notes directly to the incident work order. Every attachment is timestamped and linked to the asset record. The evidence stays connected to the failure event — not stored in a separate folder that may not be found during the next investigation.
Cryotos embeds the 5 Whys root cause analysis workflow directly in the work order closure process. A technician cannot close a breakdown work order without logging the root cause — which means the analysis happens at the point of maximum knowledge (immediately after repair) rather than being deferred to a meeting that may never happen.
Corrective actions are entered as follow-on work orders in Cryotos, with owners and due dates. The system sends reminders before due dates and escalates to supervisors if they pass without completion. When an investigation finding requires a PM schedule change, Cryotos updates the preventive maintenance task directly — so the outcome changes actual maintenance behavior, not just documentation.
Over time, Cryotos surfaces patterns across investigations: assets with recurring failure modes, root causes that appear on multiple machines, and failure modes that cluster by shift or season. This trend data moves a maintenance program from reactive investigation to proactive prevention. It only exists if investigations are logged consistently in a structured system. Maintenance teams using Cryotos report up to 30% reduction in unplanned downtime and 25% faster repair turnaround — outcomes that require investigation discipline, not just response speed.
The timeline depends on the complexity of the failure. For a straightforward failure on a well-known asset, an investigation can be done in two to four hours. This includes evidence collection, timeline reconstruction, root cause analysis, and a draft report. For complex failures with multiple contributing causes or multi-day timelines, a full investigation may take one to three days. The corrective action phase then runs for 30 to 90 days. Do not compress the evidence collection and RCA steps to save time — those steps create the value.
The investigation lead should have technical credibility and no direct accountability for the failure. In most teams, this is a reliability engineer, a senior supervisor, or a maintenance manager. The person who did the repair should participate — but not lead. Their direct involvement creates a conflict of interest in the root cause analysis.
An incident investigation is the full process — securing the scene, collecting evidence, interviewing witnesses, building the timeline, analyzing causes, writing the report, and tracking corrective actions. Root cause analysis is the specific analytical step where the team identifies the deepest correctable cause. You need the investigation to get the facts. You need the root cause analysis to make sense of them. Running an RCA without a proper investigation is like diagnosing a patient without examining them — the conclusions rest on incomplete information.
An investigation report should include: a factual failure summary (what, when, where, impact), a reconstructed timeline with data sources noted, an evidence inventory, root cause analysis findings with the full cause chain, specific corrective actions with named owners and due dates, and a lessons learned section. Write the report for someone who was not there. They should understand the failure, the causes, and the required actions without needing anyone to explain it.
Prevention requires two things: a root cause that is correctable at the system level, and corrective actions that are tracked to completion. Most recurrences happen for one of two reasons. Either the investigation stopped at the immediate cause — which led to a parts replacement rather than a system change. Or the corrective actions were identified but never tracked. Enter every corrective action into your CMMS with an owner and due date. Schedule a 90-day check to confirm the same failure has not recurred. If it has, the root cause analysis needs to go deeper.
Every equipment failure is an opportunity — not to assign blame, but to make your maintenance system more reliable. Schedule a free demo to see how Cryotos structures incident investigation workflows, embeds root cause capture into work order closure, and tracks corrective actions to completion — so your investigation effort actually prevents the next failure.


Cryotos AI predicts failures, automates work orders, and simplifies maintenance—before problems slow you down.