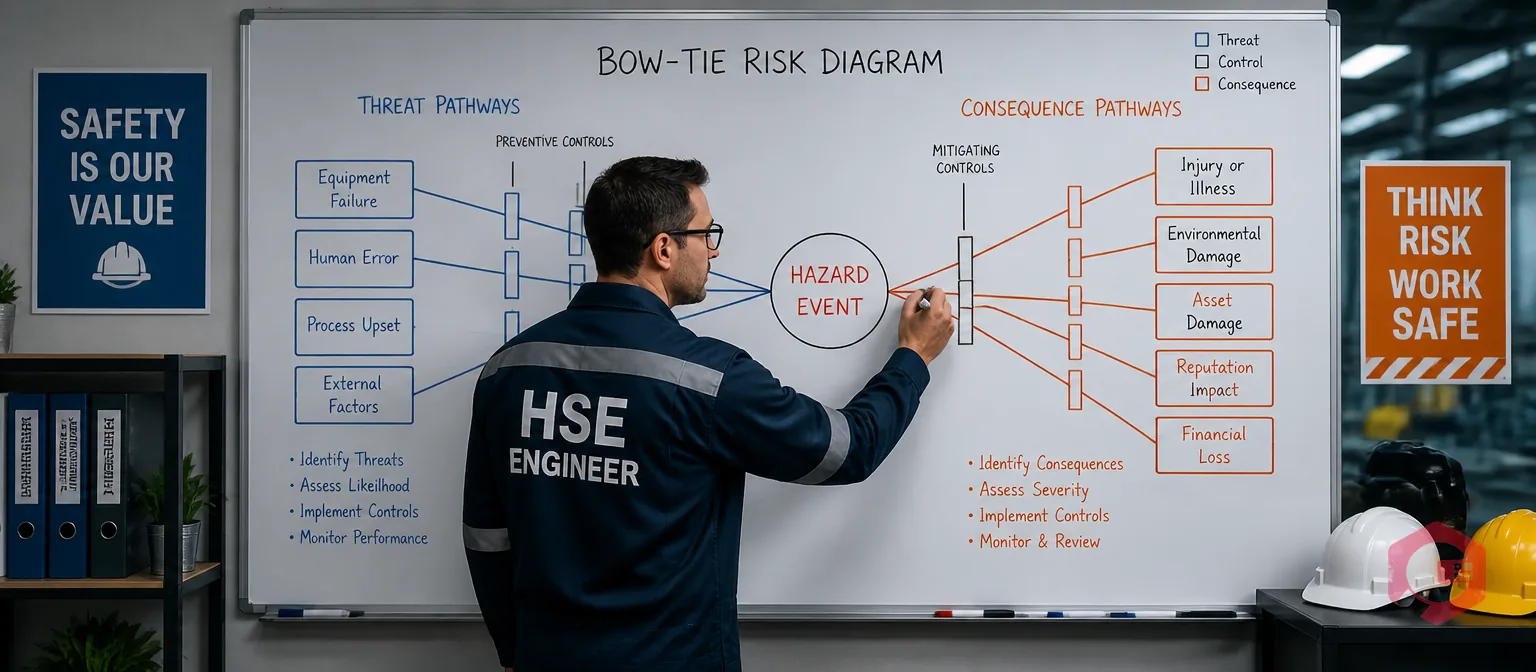
Bowtie analysis is a risk assessment method that maps the causes and consequences of a hazardous event in a single visual diagram — shaped like a bowtie — allowing safety teams to identify preventive and mitigative controls in one structured view. Originally developed in the oil and gas industry and now used across manufacturing, chemicals, mining, and facilities management, a bowtie diagram splits at a central "top event" (the point where a hazard becomes an incident) with threats branching left and consequences branching right.
According to OSHA, uncontrolled hazards remain among the leading causes of workplace incidents in industrial environments. Bowtie analysis gives safety managers a practical, auditable framework to assess those hazards systematically — and to assign ownership of every control barrier to a specific person, procedure, or system.
Key Takeaways

Bowtie analysis is a cause-consequence diagram that provides a clear, visual representation of how a hazardous event can occur and what will happen if it does. The name comes from the shape of the diagram: threat pathways converge from the left toward a central "top event," and consequence pathways fan out to the right, resembling the two triangles of a bowtie.
The method was formalised in the 1980s by Shell and later adopted under the ISO 31000:2018 Risk Management standard. Unlike a fault tree (which only analyses causes) or an event tree (which only analyses consequences), the bowtie combines both halves into a single diagram — making it uniquely effective for communicating risk to both technical teams and non-specialist managers.
The central strength of a bowtie is not just mapping risk — it is mapping controls. Every pathway in the diagram carries barriers: preventive barriers on the left (before the top event) and recovery barriers on the right (after it). When a barrier fails or is missing, the diagram makes that gap immediately visible.

A correctly constructed bowtie diagram contains five distinct elements. Understanding each is essential before you attempt to build one for your facility.
A complete bowtie also assigns each barrier a "degradation factor" — a condition that could make the barrier fail — and a "degradation control" that monitors or maintains barrier integrity. This is the level of detail that separates a robust bowtie from a visual checklist.
Building a bowtie analysis is a structured workshop process. A typical session runs 3–5 hours for a single hazard scenario with a cross-functional team of 4–8 people. Here is the recommended sequence:
Once your bowtie analysis is complete, use your safety compliance checklist to verify that every identified barrier maps to a documented procedure, inspection schedule, or work order in your maintenance management system.
Safety teams often use bowtie analysis alongside other risk tools, but each method serves a different purpose. Choosing the right tool — or understanding how they complement each other — prevents redundant work and ensures your risk assessments cover all dimensions.
| Dimension | Bowtie Analysis | FMEA | Fault Tree Analysis |
|---|---|---|---|
| Primary Focus | Causes + consequences of a top event with barrier controls | Failure modes of individual components and their effects | Logical causes leading to a single undesired event |
| Direction | Both (causes → top event → consequences) | Forward (failure → effect) | Backward (top event ← causes) |
| Best For | Major hazard risk communication and barrier management | Component-level reliability and design review | Deep causal analysis of a specific failure event |
| Output | Visual barrier diagram with ownership and degradation controls | Risk priority numbers (RPN) per failure mode | Fault tree with probability calculations |
| Audience | Cross-functional teams, regulators, management | Engineers, reliability teams | Reliability engineers, safety specialists |
| Barrier Tracking | Yes — explicit, with owner and verification | Partial — mitigation actions tracked | No — causal analysis only |
| Quantitative? | Qualitative (quantitative versions exist) | Semi-quantitative (RPN scoring) | Quantitative (fault tree probabilities) |
In practice, FMEA feeds information into a bowtie analysis — the failure modes identified in an FMEA become the threat pathways on the left side of the bowtie. Fault tree analysis provides the logical depth behind individual threats when a single pathway needs detailed investigation. Use them together on major hazard events for maximum analytical rigour.
Bowtie analysis originated in oil and gas and has since spread to any industry where a single failure event can produce catastrophic consequences. Here are the sectors where it delivers the most impact.
Across all industries, the common factor is that bowtie analysis works best for hazards where the top event is specific, the consequences are severe, and the controls need to be actively managed and verified rather than simply documented.

A bowtie diagram is only as effective as the barriers it documents. If those barriers are not actively maintained, tested, and tracked, the diagram quickly becomes a compliance artifact rather than a live risk management tool. This is where a CMMS transforms bowtie analysis from a one-time workshop output into an operational safety system.
The connection works at three levels. First, barriers identified in the bowtie that require physical maintenance — pressure relief valve testing, fire suppression system inspection, safety interlock verification — become preventive maintenance tasks scheduled in the CMMS. Each task has a frequency, a checklist, and a completion record that provides the evidence trail required for regulatory audits and safety case review.
Second, barrier degradation factors that require monitoring translate into work order triggers. When an inspection reveals that a safety barrier is degraded — a worn seal, a malfunctioning alarm, a blocked drain — a work order management workflow ensures the corrective action is assigned, tracked to closure, and timestamped. This closes the gap between identifying a degradation factor and actually fixing the underlying issue.
Third, permit-to-work systems connect directly to bowtie barriers for high-hazard tasks. When maintenance technicians work on an asset that is the subject of a bowtie analysis, a digital permit to work software ensures that each applicable barrier — isolation, gas testing, rescue provision — is verified before work begins. This makes the bowtie not just a design-time analysis tool but a live control verification mechanism at the point of work.
Cryotos CMMS connects barrier management to preventive maintenance scheduling, work order workflows, and digital permit-to-work processes — giving safety managers a single platform to verify that every barrier identified in the bowtie is functioning, maintained, and documented. Maintenance teams using this integrated approach have measurable evidence for every barrier status at any point in time, which is exactly what regulators and auditors require.
A risk assessment identifies hazards and evaluates their probability and severity to produce a risk rating. A bowtie analysis goes further: it maps the specific pathways by which a hazard escalates to a top event and then to consequences, and it assigns specific barriers to each pathway with named owners and verification schedules. Bowtie analysis is a method within the broader risk assessment process, focused specifically on major hazard scenarios where barrier management is critical.
Use bowtie analysis when the consequences of a top event are potentially catastrophic — fatalities, major environmental damage, or large-scale production loss — and when you need to demonstrate that specific controls are in place, owned, and verified. For lower-consequence routine hazards, a standard risk matrix or FMEA worksheet provides sufficient rigour at less analytical investment.
There is no fixed number, but industry practice suggests 2–5 barriers per threat pathway and 2–4 barriers per consequence pathway as a practical target. More barriers don't automatically mean better safety — what matters is that each barrier is independent, effective, and actively maintained. A single well-managed barrier is safer than five barriers that are never verified.
Yes — and digital bowties are significantly more valuable than paper versions because barriers can be linked directly to maintenance schedules, permit-to-work systems, and inspection records. When a barrier's verification task is overdue in the CMMS, the digital bowtie can flag the gap in real time. Software platforms that integrate bowtie management with maintenance workflows give safety teams a live view of barrier status rather than a point-in-time diagram.
At minimum, bowties should be reviewed annually and whenever a significant change occurs — new equipment, a process modification, an incident, a near-miss event, or a change in regulatory requirements. In practice, bowtie reviews triggered by incidents and near-misses are often more valuable than scheduled reviews because they incorporate real failure data into the diagram rather than theoretical scenarios.
Bowtie analysis gives safety teams a clear, auditable picture of how major hazards are controlled — but the diagram only protects your people if every barrier behind it is actively maintained and verified. Schedule a free demo to see how Cryotos connects your bowtie barrier management to preventive maintenance scheduling, digital work orders, and permit-to-work workflows in a single platform.


Cryotos AI predicts failures, automates work orders, and simplifies maintenance—before problems slow you down.