Cutting changeover time with SMED — Single Minute Exchange of Die — is one of the fastest ways to recover lost production capacity without buying new equipment. The methodology, developed by Shigeo Shingo, is built on a single practical discipline: identify every activity in your changeover, separate the ones that require the machine to be stopped from the ones that don't, and execute as much preparation as possible before the machine comes to a halt. Done systematically, this approach cuts changeover time by 50% or more in the first pass and creates the foundation for further reductions over subsequent improvement cycles.
This guide is a practical implementation handbook — not a theory overview. It walks you through how to time and baseline your current changeover, how to classify and convert activities, what to fix first for fastest results, and how to lock in the gains so they don't erode six months after the improvement event.
You cannot improve what you haven't measured. Before touching any process, assign one person to observe, time, and document a complete changeover from the moment the last good part of the current run is produced to the moment the first confirmed good part of the new run comes off the line. Use a stopwatch and a notebook — or better, a phone camera pointed at the machine.
Capture every activity, no matter how small: walking to the tool store, waiting for the die to arrive, searching for a wrench, reading a setup sheet, making a phone call to confirm a parameter. Write down the start time, end time, duration, and a description of each activity. For a typical 60–90 minute changeover, you'll end up with 30–60 individual activities. Most people are surprised by how many of them involve waiting, walking, or searching rather than actually working on the machine.
Record the actual elapsed time for three separate changeovers if you can — changeover times vary significantly run-to-run, and the average is more useful than any single observation. Also note the first-time quality outcome: how many startup parts were produced before the first confirmed good part? A changeover that restarts the machine in 30 minutes but then generates 15 minutes of defective startup parts is a 45-minute changeover for OEE purposes, not a 30-minute one.
Log each changeover as a planned downtime event in your downtime tracking system with a dedicated "changeover" reason code. This creates a timestamped baseline in your CMMS that you'll compare against after each improvement cycle — making progress visible and preventing the measurement drift that causes SMED gains to go unnoticed or unreported.
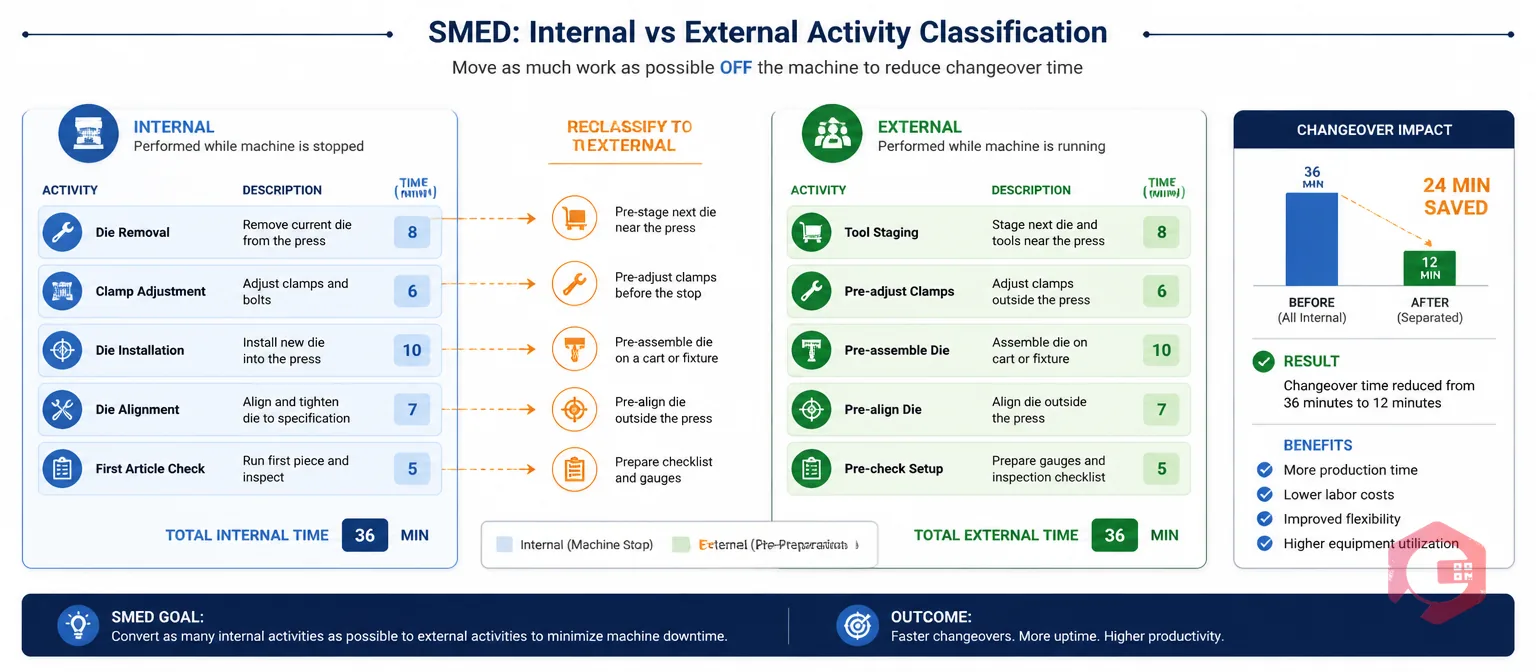
Review the activity list from your baseline observation and mark each item with one of two labels: Internal (machine must be stopped to do this) or External (can be done while machine is still running).
Be strict about this classification. An activity is only genuinely internal if it physically cannot be completed while the machine is running — for example, removing the die from the press, adjusting the clamp height, or setting the machine to the new product parameters at the control panel. Everything else — fetching tools, staging materials, filling out paperwork, pre-heating a die, retrieving the new setup sheet, staging the first batch of raw material at the infeed — is external and should be moved before the machine stops.
In most pre-SMED operations, 30–50% of what's currently done during the machine stop is actually external work that has never been reclassified. This is the biggest single source of free improvement: simply moving these activities to before the machine stops, with no engineering change required, typically cuts changeover time by 30–50% immediately. The only tool you need to achieve this is a pre-changeover preparation checklist — a written list of every external activity that must be completed before the machine is allowed to stop.
Build that checklist now. It becomes the first version of your standard changeover work order. In your work order management system, create a planned work order for each changeover type that contains this pre-changeover preparation checklist as a required step before the machine stop is authorised. This turns the discipline of pre-preparation from a verbal instruction into a documented, trackable requirement.
Not all SMED improvements take the same effort or the same time to deliver. Sequencing them correctly lets you show rapid results while building toward larger structural gains in parallel.
| Improvement Type | Examples | Effort | Timeline | Typical Impact |
|---|---|---|---|---|
| Move external work to before machine stop (no-cost) | Pre-stage tools, fetch die in advance, prepare documentation before shutdown | Low — process change only | Same week | 20–40% reduction immediately |
| Standardise setup parameters (low-cost) | Create setup sheets with all settings pre-filled; eliminate calculation during stop | Low — documentation work | 1–2 weeks | 5–15% further reduction |
| Add shadow boards and 5S at machine (low-cost) | Dedicated tool location at each machine; eliminate tool searches during changeover | Low — organisation work | 1–3 weeks | 5–10% further reduction |
| Convert internal tasks to external (medium effort) | Die pre-heating station, offline presetter for tool heights, pre-assembled sub-assemblies | Medium — may need equipment or fixtures | 1–3 months | 10–20% further reduction |
| Reduce internal task time (higher effort) | Quick-clamp systems, standardised die heights, one-touch fasteners, parallel working | High — tooling or equipment changes | 3–6 months | 10–25% further reduction |
The first two or three rows of this table are where most organisations find 50%+ of their total improvement opportunity. They require no capital, no engineering approval, and no lead time — just a discipline change and a checklist. Execute these in week one. The lower rows are where you plan your kaizen events and capital requests for months two through six.
Every improvement you make needs to be captured in a written standard work document before it becomes reality. Without this, the improved process exists only in the heads of the people who were in the room when it was designed — and it disappears the moment those people rotate shifts, go on leave, or move to a different role.
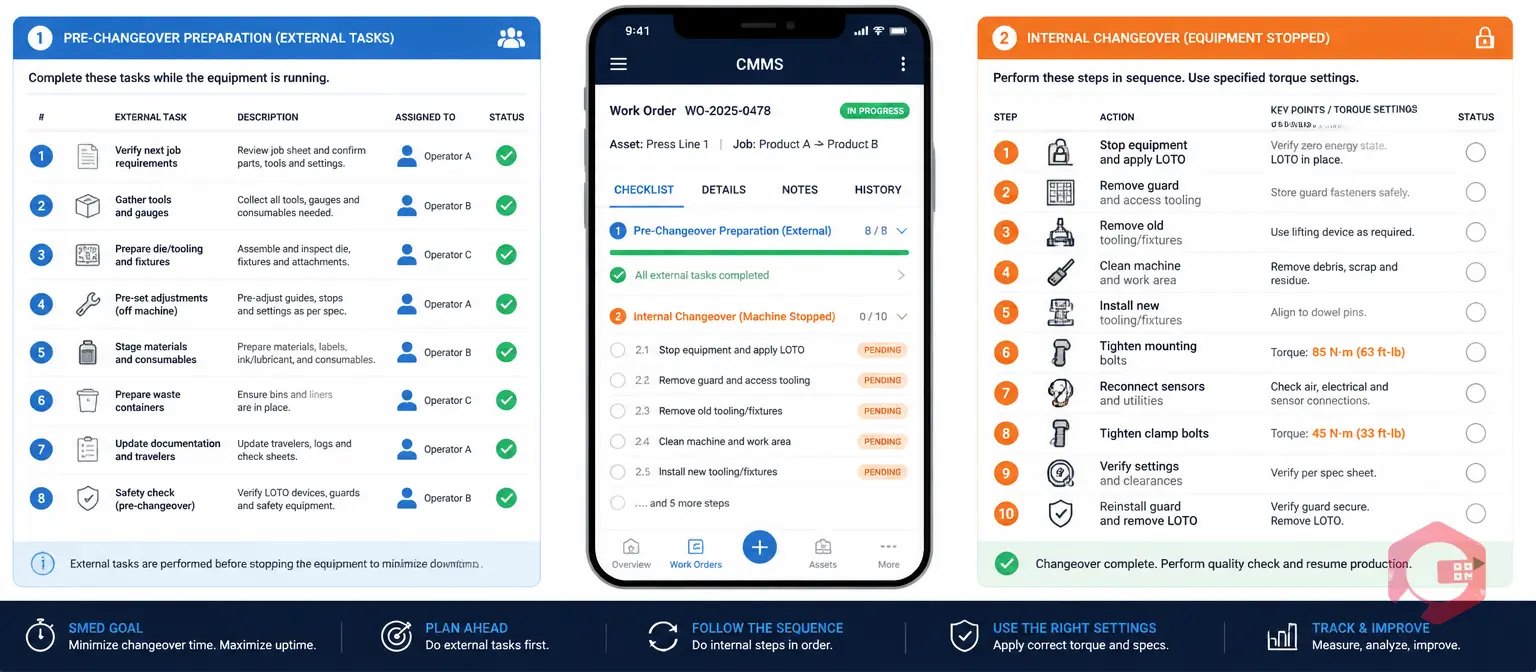
The standard changeover procedure has two parts. The first is the pre-changeover preparation checklist — every external activity that must be completed before the machine is allowed to stop, in the order they should be executed, with the person responsible for each task named. This is completed while the machine is still running.
The second is the internal changeover sequence — every remaining internal task in the exact correct order, with specified settings, torque values, alignment dimensions, and functional verification steps. This is the document the technician follows while the machine is stopped. Every step is written as an action ("tighten clamp bolt to 45 Nm") not a description ("check clamp bolt"). Ambiguity in a standard work document is a direct cause of machine stop extensions and first-pass quality failures.
Store both documents as attachments in the maintenance checklist linked to the machine's changeover work order in your CMMS. When a technician opens the changeover work order on their phone, the standard procedure appears — not a laminated card that may be outdated, but the current approved version controlled by the maintenance team. This is how standard work becomes a living document rather than a shelf artefact.
After your first round of improvements is in place — external activities moved to before the stop, setup sheets standardised, tools located at the machine — run a trial changeover using the new procedure. Time it the same way you timed the baseline: from last good part to first confirmed good part. Have the same observer present, capturing the same level of activity detail.
Compare the new time to the baseline. In most first-pass implementations, you'll see a 30–50% reduction from the no-cost improvements alone. Document this result, share it with the team, and record it against the baseline in your BI dashboard. Visible progress is the fuel that sustains the improvement effort — if people can see the 90-minute changeover drop to 45 minutes and then to 25 minutes over successive cycles, the programme builds its own momentum.
The trial also typically reveals new issues that weren't visible in the baseline observation. The pre-preparation checklist may have a missing step. The setup sheet may have an error that forces a mid-stop adjustment. The shadow board location may be slightly awkward for one of the tasks. Each of these is a revision item for the standard work document — update it immediately while the observation is fresh, don't wait for the next kaizen event.
Once the low-cost improvements are captured and running consistently, the next lever is parallel working — having two people perform non-conflicting internal tasks simultaneously rather than sequentially. For a machine with tasks on both the operator side and the rear/drive side, one technician can be working on each side at the same time. For machines with multiple clamping points, each technician can work a different set. Parallel working can cut internal task time by 30–50% without changing any individual task — it's purely a labour choreography change.
At the same time, review the internal task list for elimination opportunities. Some internal tasks exist not because they're functionally necessary but because of a design constraint that was never questioned. Common examples include: re-centring a die that could be eliminated with a datum pin; manually inputting machine parameters that could be stored as a recipe and recalled with one button; performing a lengthy warm-up cycle for a die that could be pre-heated externally. Each of these requires an engineering or capital decision — but the payoff is permanent internal time reduction, not just rearrangement.
Log these elimination and engineering opportunities as work requests in your CMMS with a priority flag. This prevents them from falling through the cracks after the kaizen event energy fades and ensures they're reviewed in the next improvement planning cycle. The work requests module in Cryotos CMMS is ideal for capturing these longer-horizon improvement items alongside the day-to-day corrective and preventive work queue.
Every structural improvement you make in SMED Stage 4 — quick-clamp systems, offline presetters, standardised fixtures, die pre-heat stations — creates a new maintenance dependency. These assets are now load-bearing components of your changeover performance. If the presetter drifts out of calibration, your offline tool-height settings are wrong, and the first-pass quality failure restores the original changeover time as if the improvement never happened.
Every piece of SMED-enabling equipment must be registered in your asset maintenance management system with its own maintenance schedule. For a presetter tool, that means a calibration interval (typically quarterly or bi-annual depending on usage) and a traceable calibration record. For a quick-clamp system, that means a periodic inspection of cam-lock wear and lubrication. For a die pre-heat station, that means a temperature calibration check on the thermostat.
This step is where most SMED programmes fail silently. The kaizen team never considered the enabling equipment as maintenance assets — they were project deliverables, not operational assets. Six months later, a presetter is out of calibration, a quick-clamp is sticky, and the changeover time has crept back up. Nobody knows why because nobody tracked it. Add these assets to your preventive maintenance schedule on the day the equipment is installed, before it ever gets used in a production changeover.
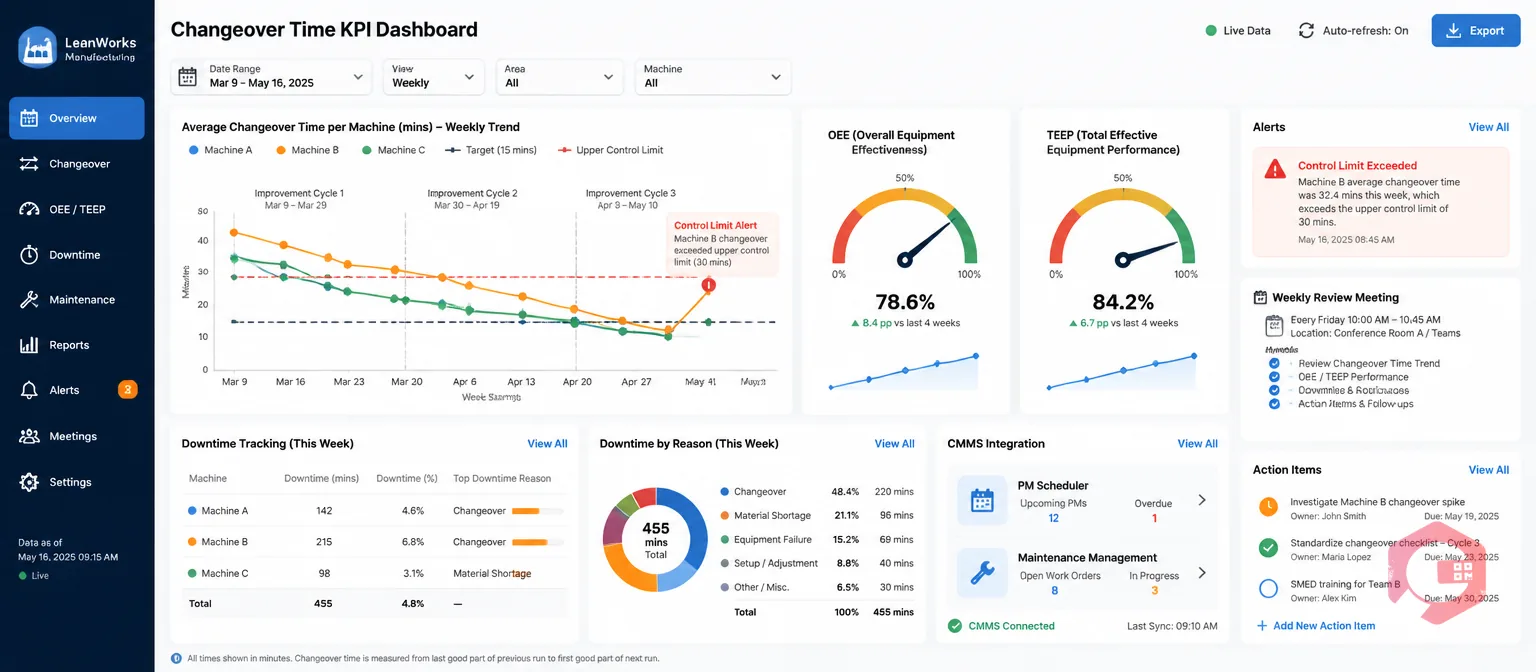
The single most effective thing you can do to sustain SMED gains is to make changeover time visible in real time. When changeover duration is tracked, graphed, and reviewed weekly, any regression is caught within a week — not after a six-month audit reveals you're back where you started.
Set up a trend chart of average changeover time per machine per week in your BI dashboard. Set a control limit — if any individual changeover exceeds the target by more than 20%, generate an automatic alert to the maintenance supervisor. Review the trend chart in the weekly operations meeting alongside unplanned downtime and OEE. Changeover time improvement is a direct OEE improvement: as planned downtime from changeovers falls, the loading factor in the TEEP calculation rises, and actual available production capacity increases.
When you hit the target changeover time consistently for 4–6 weeks, set a new, lower target and start the improvement cycle again. SMED is not a one-time project — it's a discipline that compounds. According to the Lean Enterprise Institute, organisations that run multiple SMED improvement cycles routinely reach 75% reductions from baseline over 12–18 months. Each improvement cycle reveals the next constraint. The teams that reach sub-10-minute changeovers are the ones that ran five or six improvement cycles over 12–18 months, each one building on the documented standard work from the previous cycle.
The no-cost improvements — moving external activities to before the machine stop and creating the pre-changeover preparation checklist — can be implemented in the same week as the baseline observation. A structured kaizen event of 3–5 days can typically deliver a 50% changeover reduction for one machine or product family in that week. The full programme, including structural changes like quick-clamp installation and presetter procurement, typically spans 3–6 months per machine but delivers incremental improvements throughout that period rather than waiting for a single big result at the end.
Sustainability requires three things working together: the improved procedure must be captured in a standard work document stored in the CMMS (not just in people's heads), the enabling equipment must have a maintenance schedule, and changeover time must be tracked as a live KPI reviewed in weekly operations meetings. Any one of these three missing is enough to cause the gains to erode within 6–12 months. The most common failure is the first one — excellent improvement without documentation.
Prioritise changeovers with the highest frequency multiplied by the longest duration — these represent the greatest total production time loss. A 90-minute changeover that happens twice a week consumes 15 hours of production capacity per month. A 30-minute changeover that happens 20 times a week consumes 10 hours. The first is a better SMED target despite each individual changeover being longer. Run the numbers for all changeover types on your highest-constraint machines and rank by total monthly impact before selecting your first target.
Yes — and for many small and mid-sized operations, incremental SMED is more practical than a structured kaizen event. The no-cost improvements (classifying activities, creating pre-changeover checklists, 5S at the machine) can be led by the maintenance supervisor or production engineer over 2–3 weeks without pulling a cross-functional team off the floor for five days. The kaizen event format is more valuable for structural improvements — quick-clamp installation, presetter procurement — where cross-functional input from engineering, procurement, and finance is needed. Match the approach to the type of change.
The no-cost and low-cost phases of SMED — which typically deliver 40–60% of the total improvement potential — require no special equipment at all. You need a stopwatch, a notebook, a checklist template, and a CMMS to document and track the improvements. Special equipment (presetters, quick-clamp systems, die pre-heat stations) is required for the structural improvement phases, but these come later and are justified by the ROI already demonstrated from the earlier phases. Start with documentation and process discipline; the capital case becomes easy to make once you've proven the methodology works on your machines.
Cutting changeover time with SMED is one of the highest-return improvements available to any multi-product manufacturer — but only if the gains are captured, standardised, and sustained. Cryotos CMMS connects every stage of the SMED implementation to a living operational record: the maintenance checklist module holds your standard changeover procedures, the downtime tracking system records every changeover against your baseline, the PM scheduler maintains the enabling equipment, and the maintenance management dashboards keep changeover time visible as a live KPI. Book a free demo to see how Cryotos supports your SMED programme end to end.


Cryotos AI predicts failures, automates work orders, and simplifies maintenance—before problems slow you down.